How to Save a Document in Word 2016

Don't think that you have to wait until you finish a Word 2016 document to save it. In fact, you should save almost immediately — as soon as you have a few sentences or paragraphs.
To save a document for the first time, follow these steps:
- Click the File tab.
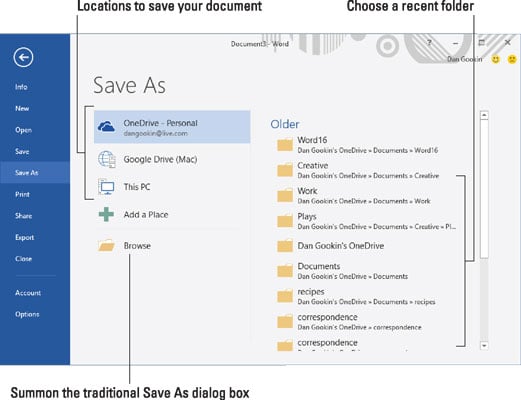
- Choose the Save As command. The Save As screen appears, similar to the one shown here. This screen is part of Word's Backstage, which is an alternative to the traditional Windows Save As dialog box.

The Save As screen.
The document doesn't close after you save. You don't need to quit Word. You can keep working. As you work, continue to save.
- You can skip the File tab process by instead clicking the Save button on the Quick Access toolbar. If the document hasn't yet been saved, the Save As screen appears.
- Your clue that the document is saved successfully is that its filename appears on the document's title bar, top center of the Word window.
- The Save As command can also be used to save a document with a new name, to a different location, or in a different format.
- Do not save a document to removable media, such as an optical disc or a memory card. Instead, save the document to the computer's main storage device, the hard drive or SSD. If you save to removable media and that media is accidentally removed, you may lose your document or the computer may crash.
- To place your document file on removable media, save and close the document. Copy the file from the computer's primary storage to the removable storage. This operation is done in Windows, not Word.
- As an alternative to using removable media, save your document to cloud storage. Documents saved to OneDrive can be shared with others.
About This Article
About the book author:
Dan Gookin wrote the first-ever For Dummies book, DOS For Dummies. The author of several bestsellers, including all previous editions of Word For Dummies, Dan has written books that have been translated into 32 languages with more than 11 million copies in print.


